
Hi guys. Today I wanted to share what I’m calling my InstaDisney Installation. I have been planning this project and searching for inspiration on Pinterest for quite a while. But couldn’t really find anything I wanted to copy. So, I did the unthinkable. I actually did a project on my own without copying a Pinterest idea! I know!! Unheard of!


It’s so simple, but it took me so long to get the dang strings hung. I’m not smart enough to just know how to do these types of projects unless I’m following someone else’s instructions. And since I just made up this project, I had to make up how to get it done too.
To help you avoid putting lots of tiny tack holes on your walls (like I did, sorry Honey!!) trying to get your tacks and strings lined up, even, and level, I thought I’d share the method that took me an embarrassingly long time to figure out!
Besides the photos, you might have everything you need for this installation around the house already!
Here’s what you need:
*masking tape or painters tape
*a pencil
*a yard stick, measuring tape or ruler
*a level
*string (I used 8 yards of bakers twine)
*thumb tacks
*paper clips
and of course . . .
*printed Instagram photos
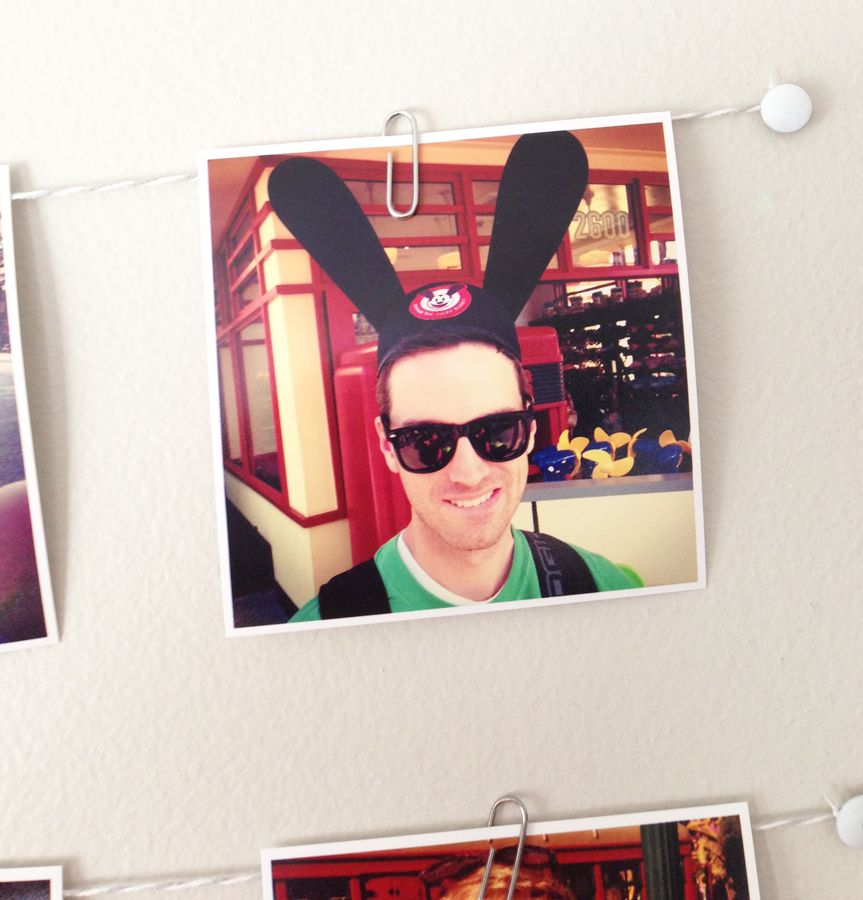
Mine are all photos I Instagrammed from Disneyland on our most recent trip. I love the idea of an Insta-Disney wall, but obviously your photos can be of anything you want. (Even if you don’t Instagram you could crop any of your snapshots into squares!)
Plug your phone into your computer and get all your photos off your phone. I used followgram.me to look through all my Instagram photos as a reference for picking and choosing the images I wanted and then pull the higher resolution ones off my hard drive and into a folder to print. I know some people have just saved and printed the images off followgram. But I figured it was safer to use my higher resolution ones that were already imported onto my computer.
I printed 3.5″x3.5″ squares. I ordered from my favorite local print lab, Persnickety Prints. I’m lucky in that I can just drive over and pick up my prints. But they ship all over too! Persnickety does offer Instagram printing but they charge a lot extra for this service. Basically you’re paying extra for them to cut the prints square and put a white border on. Both of those things I can do myself!! Plus, they don’t offer 3.5×3.5 size in Instagram printing, and I just really like that size.
So, instead of paying 85 cents a print for their “Instagram prints” (ouch! Their Instagram prints are so expensive!!!) I paid 19 cents a print for 3.5×5 photos with the extra white space on either side. I put my own white border on the images in Photoshop (because Persnickety charges extra for that even on normal prints). However, when I picked up my prints they offered to cut them square for me for free! Very nice of them. They have great customer service. And beautiful print quality! So I made 64 prints for about 12 bucks! SCORE!!
Ok, now on the installation . . .
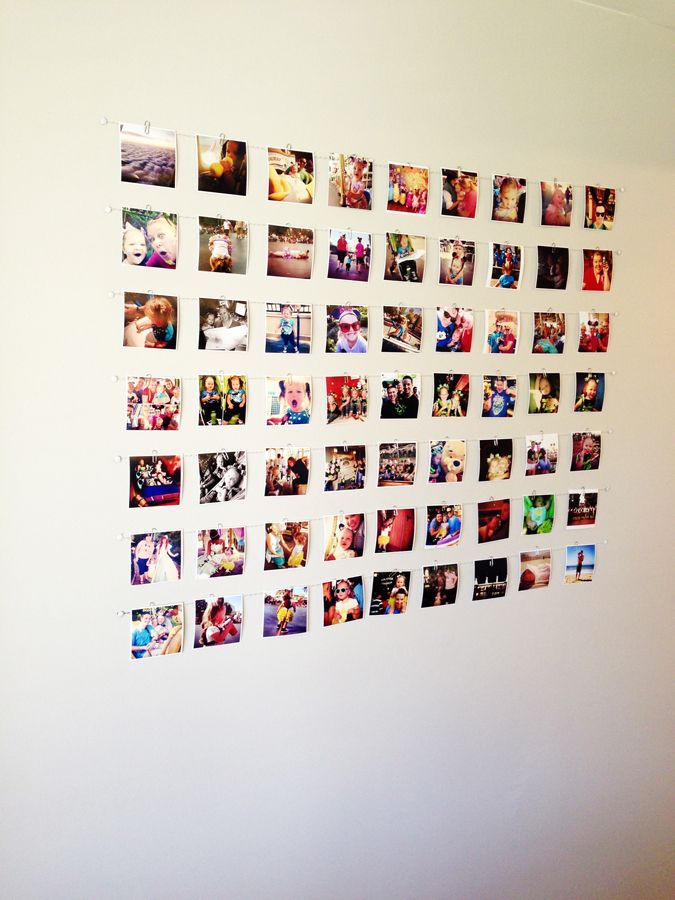
Use your tape to mock out an idea of where your block of photos will be. This will help you get an idea of how big you want it, how high to start it, and what shape will look good on your wall space. I ended up doing a very different grid that I originally thought I would.
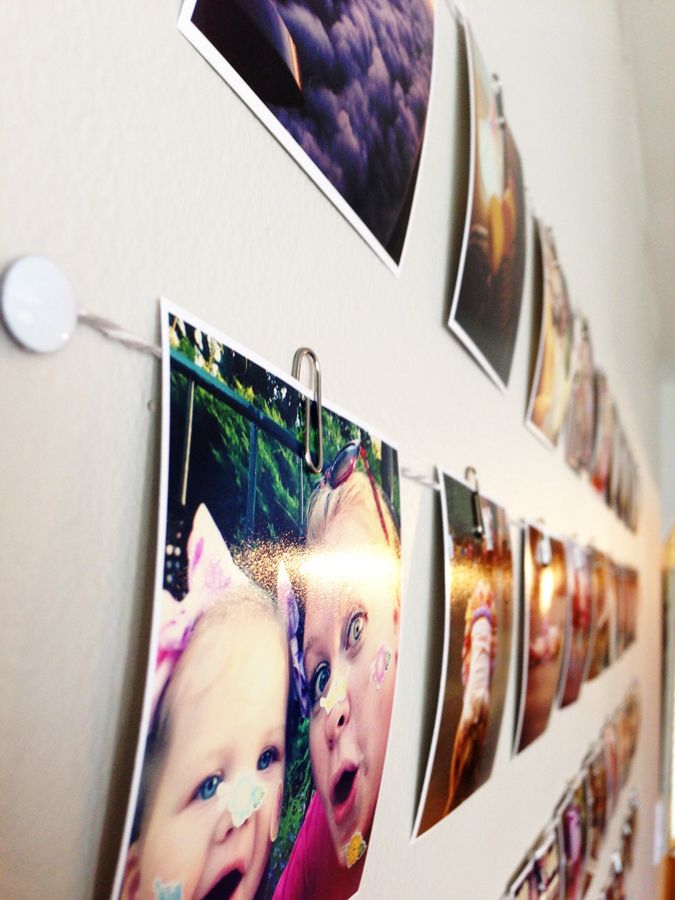
Start by getting your first string up.
*Measure and mark the center of your wall space. Then measure out where the left and right tacks will go. My strings are 43″ long and fit 9 photos per string. You can measure down from the ceiling to get an approximately level mark on each side, but keep in mind that ceilings aren’t always straight. You’ll want to use a level too.
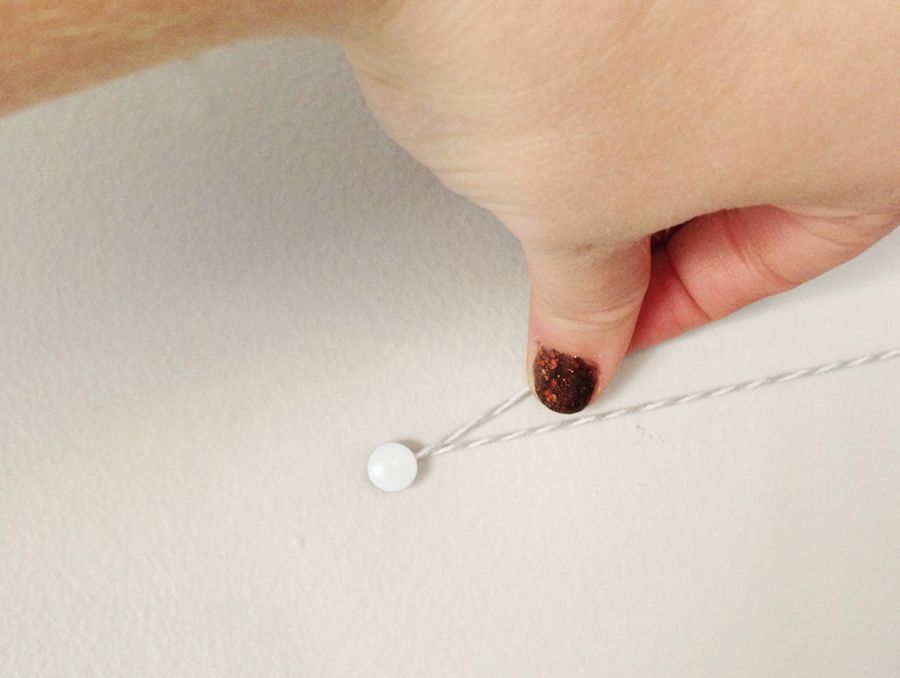
*Push a tack into the left spot. But don’t push it all the way flat into the wall.
*Tie a string on the tack and stretch the string to the right side mark you already made. Using a level to make sure your string is straight, make adjustments (if needed) to your right mark and then push a pin into the wall.
*Once the pin is in, tie the string to the right tack making sure the string is pulled across very tight. Once you hang your photos, you’ll be glad you tied your strings TIGHT.
Now it’s time to mark the rest of the tack spots. Here’s how I got mine in perfectly straight columns, and each row spaced out just right.
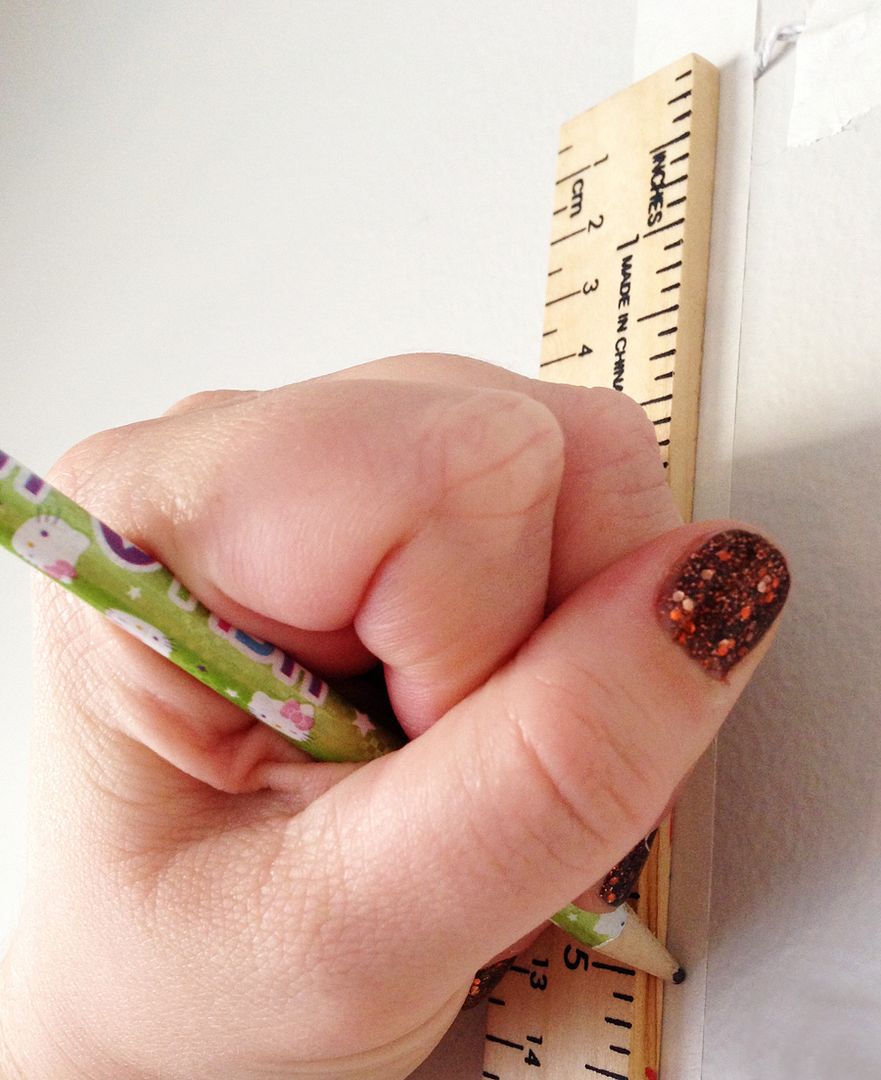
*Use masking tape or painters tape and a level to tape a straight strip down from each of the top tacks.
*Use your yard stick or ruler to mark each row. My rows were 5″ apart, which I liked for my 3.5″ photos. If you do a different size, you might want to adjust the measurement between rows. So, I made marks on the tape strip at 5″, 10″, 15″ etc. until I had enough rows. Repeat these measurements on both sides.

*Once you have all your marks done you can start putting in tacks. Again, don’t push them all the way into the wall.
*Tie the strings. After tying each one check that they are level. If you did your measurements right they should be level. (Remember to tie them so the string is pulled TIGHT across).
*Next, I marked the center of each string. I put in tacks on the wall behind the marks and rested the strings on top of the tacks. This keeps the string from drooping when you clip on all the photos. The center photo will cover this tack, so it doesn’t matter if they are in a perfectly straight column. But, if you’re like me and want them neat and straight, you can use the perpendicular level for these marks as well.

Now you’re ready for the fun/easy part! Hanging the photos!!
I tried out several ways before decided on the one I liked most.
You can clip the photo behind the string. This way shows off the string a lot if you like that look and helps the photos lay really flat against the wall.
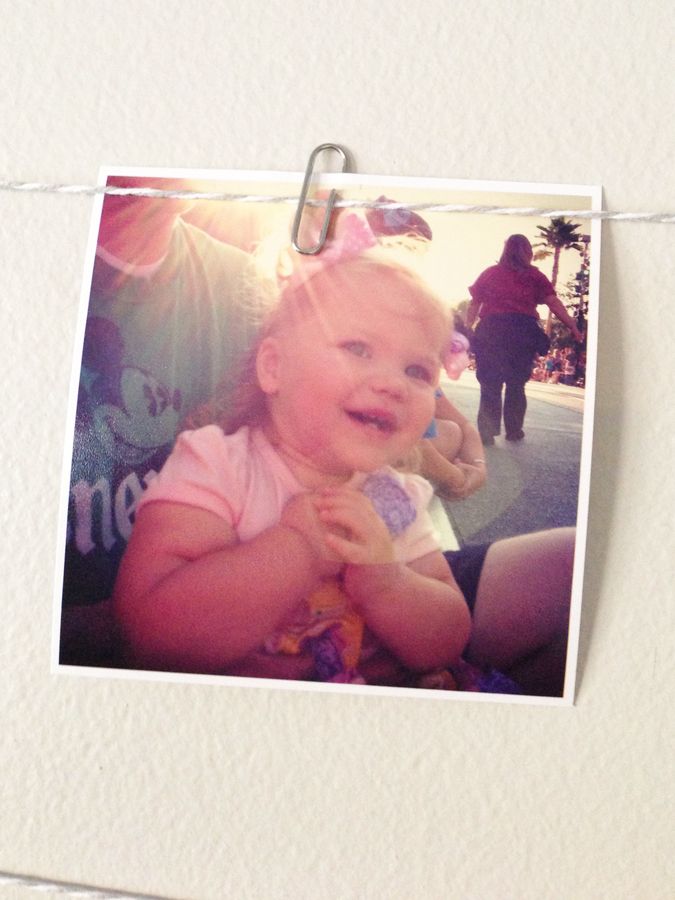
Tiny binder clips would look cute too. Or those cute itty bitty clothes pins they sell as scrapbook embellishments. But I stuck with $1.25 pack of little chunky silver paper clips from Target for now. Plus the paper clips keep it light, and won’t weigh down the strings too much.
I decided on clipping the photo in front of the string like this:
Hopefully this all made sense, but in case I lost you, feel free to ask any questions you might have.
The great thing about the wall is I get to relive and remember the trip whenever I look at it.
AND I can switch out the photos easily and cheaply. I can turn it from a Disney wall into a “fall memories” wall, or an “everyday moments” wall. I could dig way back in my feed and do all tiny baby Scarlett pictures. I can see myself customizing it for birthdays or holidays. (OOOOH!! Think how cute its gonna look for Christmas!) And my family and friends and I get to see my iPhoneography (iPhone photography) off the screen in real life. All for around 19 cents a piece! It’s so fun!
Including the cost of prints I think I only paid about $17 for this entire project. That’s awesome for filling such a huge wall space!
I’m still trying to decide what to do with the retired photos after I decide its time to hang up new ones. I’m thinking about pasting them into an old fashioned-ish type album. Maybe you guys can help me think of ideas for the retired photos. But, for the time being, these Disneyland pics are staying put. I love them so much.
I really love how the photos look when there are black and white photos and colored photos mixed together. So note for next time: do more Instagram photos with the black and white filter.
Another note for next time: I think I’ll do a little thicker white border next time. I didn’t realize how thin it would be. It might look better a bit thicker.
Hope this how-to was helpful! If you make yourself an Insta installation, make sure you share it with me. I want to see it!
Happy Instagramming!

Necessity is the mother of invention! I LOVE your wall idea and what I love most is that you can change it out over the seasons or events! You are so creative and inspirational! Thanks for the ideas you always share with all of us!
This is such a cool project and I have a blank white wall calling out for this right next to where I scrap! Only trouble is I don't instagram 🙁 time for me to jump on this band wagon I think!
1Oh my goodness it turned out so cute!!! I'm so glad you shared the tip about printing. I was going to update my Christmas tree this year and pay the $0.85 per print. But not now 🙂
So cute!! Love this idea…guess I should try and follow you on pinterest! 🙂
This comment has been removed by the author.
Dude!! This is pure awesomeness…I was just trying to plan a picture wall and I may have to do this!! Also totally jealous that you can just go to Persnickety…I need to move!!
I love this so much! I don't know if I can bring myself to do this to the wall (I am not very precise!) but I think I would love it almost as much if I string the twine across an open, ornate frame and then I only have to poke one hole in the wall. I love the idea of swapping it out for the holidays, birthdays, etc. Super cute project Britt! Oh and I love the nail polish too 🙂
I LOVE this!! I'm totally going to copy you! I have an old pinterest project in the hallway for the kids artwork that is in desperate need of a redo, and I'm always looking for space to display more pictures (my fridge is overflowing with IG pics! lol). Thanks for the tutorial! 🙂
Your project is amazing! <3
Have you seen this? It might save you some time when you want to do something else with your IG prints…
http://printstagr.am/
LeeAndra
Love this project. I have some of the little clips and some bakers twine — I will be working on this!
I LOVE this Britt!! I even couldn't wait to start and since my student room wasn't really decorated yet, it was the best way to do something with my photo's and have a cool way to put them up!
I don't have a smartphone and I don't use instagram, but I cropped my photo's in photoshop and found some filters like you can add in instagram.
So Here's my take at the project.
https://pbs.twimg.com/media/A7iXuw9CUAA7_zt.jpg
https://pbs.twimg.com/media/A7iYM8NCYAAKLsL.jpg
Thank you so much for sharing this great idea with us!