
Can you believe it?! The nursery is finally done and I can finally share it with all of you!! Everything in these renovations has taken us WAY longer than we thought, but we’re finally finished with one whole room and it feels AMAZING.
This room has come a LONG way in the past four months. It went from a dark, paneled, carpeted room full of boxes, and storage, and (let’s face it) junk . . . to by far the most beautiful, organized, awesomely FINISHED room in our entire house!
But I’m getting ahead of myself . . .

While I was in Disney World last October, Josh tore down the paneling and scraped the glittery popcorn off the ceilings in both the living room and the nursery. What we discovered was there were some walls in the nursery that didn’t have drywall behind the paneling. And there was a ton of nasty looking old glue residue from the paneling EVERYWHERE. We tried to get it off ourselves, but quickly realized we were going to need some professional help.

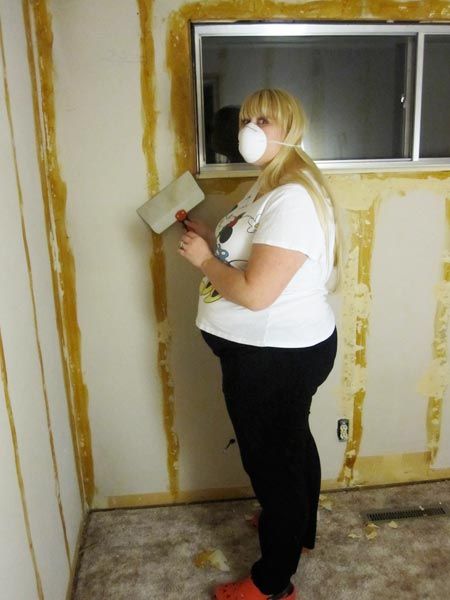
(look at that lovely glue. OH! And look at my tiny bump! It was so much smaller in November!)
So, the week before Thanksgiving we paid a couple of contractors (who did my parents’ kitchen renovation) for a day of labor to install drywall where there wasn’t any, skim coat and texture the entire room (because flat walls with all that old glue was impossible).
AND they turned the once built in desk nook with a dropped ceiling, into an empty nook with a dimmer recessed can light. We thought it would be the perfect spot to put a dresser with a changing pad on top.
Here’s a look at what it was like after our demo, before the contractors got to work:

(see how you can see through into our living room?? Those white bricks back there are our fireplace! There was no drywall behind the paneling there! CRAZY!)
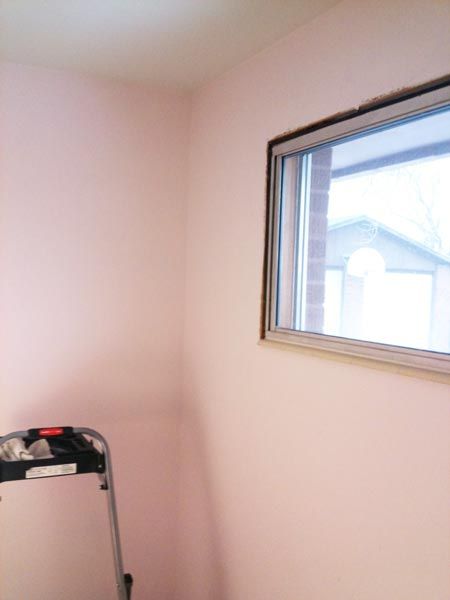
After contractors:

So now we had a crazy looking textured mess of a room that needed paint STAT!
The ceiling got a flat off the shelf white coat of paint. Home Depot was clearancing out their Fresh Aire ceiling paint, so we snagged a few buckets for the whole house at just $8.50 a can! Regularly they are like $25 or $30 I think, so getting them on clearance was a big SCORE!
For the walls, we knew we wanted a VERY soft pink. I’m talking REALLY soft. Every time we’d pick a swatch at the store, we’d bring it home and stick it on the wall and it would look completely different! ALWAYS ALWAYS bring your swatches home and see how they look taped on your wall. And spring for the $2.50 test pot of paint. We painted a couple of those in the nursery before buying the big cans and actually decided to go with the opposite one than we thought we would! It pays to take your time and test because the final color we decided on is PERFECTION!!! I couldn’t be more happy with it.
It’s Behr “Light Chiffon”. We got it at Home Depot. Behr Premium Paint & Primer saves you the step of having to prime before you paint. And its a qood quality paint. We were very happy with it.

Since beginning this renovation project, thanks to some reader suggestions, we’ve both become big fans and avid readers of Young House Love. Anyone else out there YHL fans?? Well, YHL makes it seem like painting is a snap and you should be able to get it done in one night, smiling and laughing all the way.
For us, this was not the case. Painting was long and arduous. We don’t have the steady hand that some people have to cut in without tape, so taping and cutting in was such a chore! I went into it thinking painting the room would be fun. I’d painted rooms in the past. But in the interest of “keeping it real” with you guys, it was not fun. When you’re painting a gutted room from scratch, it is just a whole lot of work. But we muscled through and got ‘er done. (We still love you YHL. We just can’t paint a room like you pros!)
When the paneling came down, so did all the trim, window frame, and door frames in the room. Not a big deal, right? We’ll just put in new ones. UGH!! That was such a long process too! I’m SO lucky to have a hand hubby who can install new trim. He did an amazing job, and worked so hard on the trim. He mitered, and hammered little tiny finish nails, and caulked it all to perfection. But that was a very long process as well.

(Keep in mind that we we were also painting, trimming, etc. the other HUGE renovated space in our house during this time too. We sort of worked on both spaced simultaneously. So, everything took a REALLY long time.)
We also realized when we first started renovations that underneath our ugly old carpet was hardwood floors! YESSS!! I seriously did a happy dance when I made that discovery. They aren’t in the best of shape. We’ll definitely be saving our pennies to have them professionally redone, but for now we’re thrilled with the FREE hardwood floors we had all along!
By now we’re already into January. The holidays made it a little tricky to get very much work done, so December just flew by! But finally the room was getting close to ready. I was out shopping for decorations, rugs, curtains, creating artwork, painting frames, all that fun stuff. And finally, this past week it all came together and we had a FINISHED SPACE!!!
In the VERY beginning I put together this design board in an attempt to convey my design ideas with Josh and to see for myself if this idea in my head was really going to look ok. I used this board all along the way to make sure my vision came together.
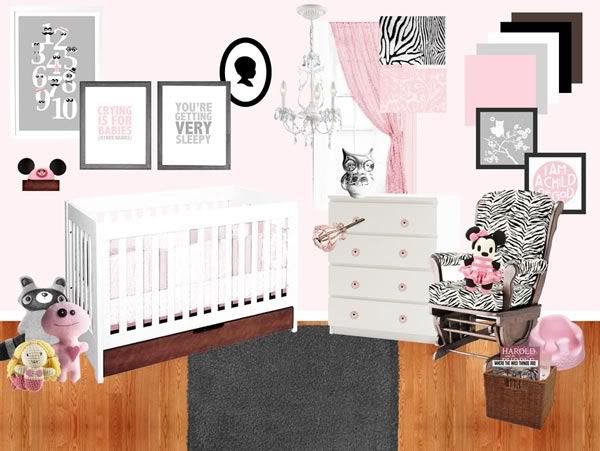
A few minor things changed along the way, but you’ll see in the photos below that we actually created almost the exact room I had envisioned! What FUN!!
Here’s the view from the doorway before we painted, newly textured walls, no trim, & ugly carpet (being used as a drop cloth at this point).

and here it is now . . .

As we go through our little tour here, keep in mind that, like all the bedrooms in our little 50s house, this room is pretty tiny (which made taking good pictures of it a trick!).
The ‘big statement’ zebra print glider has got to be the comfiest chair I’ve ever sat in. Josh’s mom found it second-hand and let us pick whatever fabric we wanted to have it recovered in as a Christmas gift. I immediately knew I wanted zebra! I wondered if she would think I was crazy, but she was all for it (she’s got a splashy design sense too!). I was so excited when I found the perfect fabric at the first store I looked at (that never happens!).
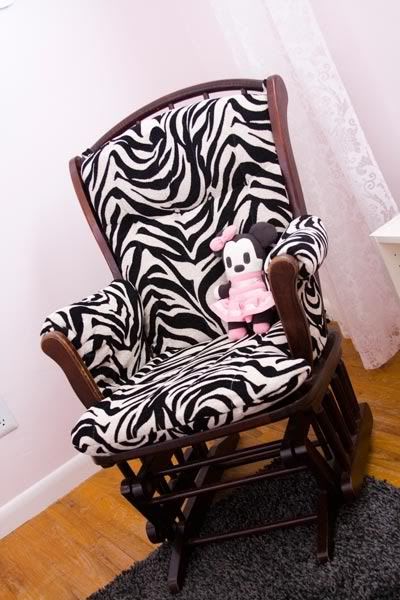
So this was our amazingly awesome Christmas gift from Josh’s parents. It totally makes the room and I’m so grateful for their thoughtful gift! Oh and throwing our cute Minnie Pook-a-Looz on the chair added the perfect touch of pink.

Above the glider we hung a Mickey shelf (that was a baby gift from a friend). Even though we didn’t want a Disney themed room, we knew we’d have a few Disney touches here and there just by second nature. That’s sort of what happens with our entire house. Disney just can’t help but creep in!
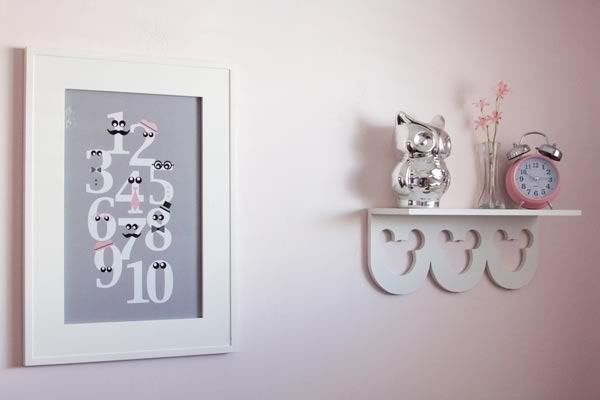
The numbers art I recreated myself from a nursery I saw online. I can’t even remember where I saw it anymore, it was so long ago. But I thought, I can TOTALLY make that! I created it in Photoshop and printed it at Costco. Cheap and adorable.
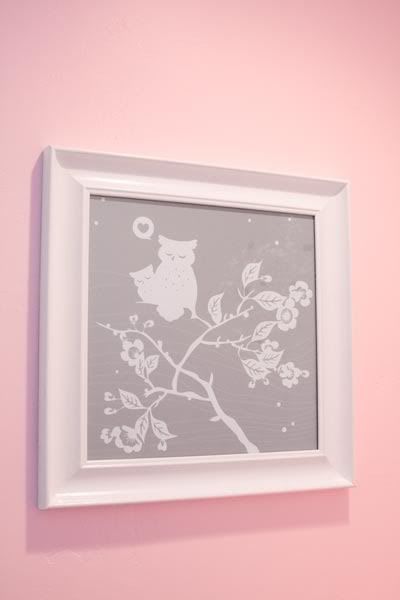
The chrome owl I got at Target a long time ago. It used to live on my desk, but it is way cuter in the nursery. (You’ll also notice a couple other owls in the room. I love owls and I just couldn’t help putting a few in the design.)
And the little alarm clock is from Hobby Lobby. I used a 40% off coupon on it, so it was like $8 or something like that. The first night we put the batteries in we didn’t realize the alarm was switched to ON. So at about 4 am we got woken up to the scariest LOUDEST alarm I’ve ever heard in my life! Josh and I both about had a heart attack! So obviously the alarm part of the clock won’t be used for our baby girl, but it is an adorable way to tell the time.
Our nursery has the BEST view in the whole house. Mount Timpanogos right outside her window. So pretty.

And lots of sunshine comes through the window too. We framed the window with these pretty curtains. And the best part is, we got them at Ikea on the cheap!
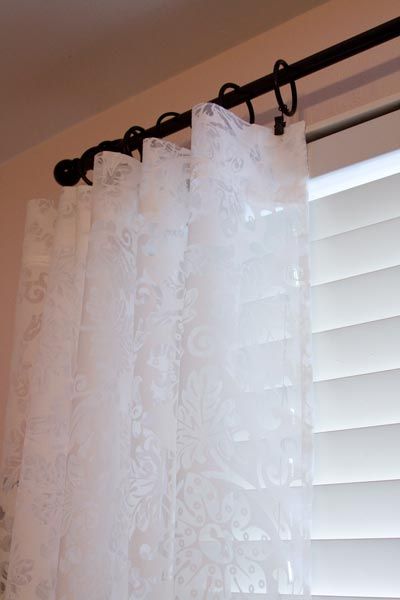
Hanging curtains was the moment the room went from a project to a ROOM. It was like magic. All of a sudden we had a real room on our hands.
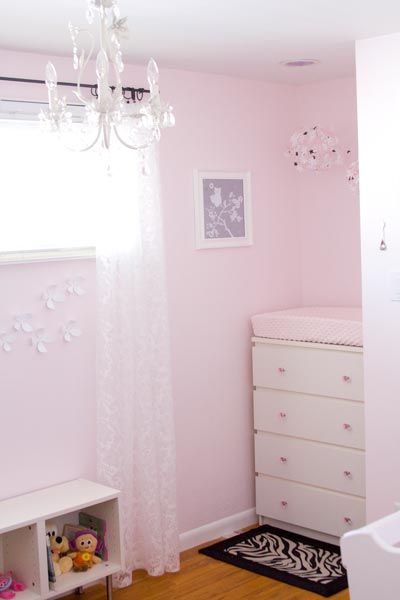
Remember that nook? Here it is all finished! A white Malm 4-Drawer dresser from Ikea fit perfectly. And once we dressed it up with some pink crystal-looking (really they are just plastic) knobs from Target, it didn’t look like your average Ikea dresser anymore.
And you might have noticed what I’ve started calling the ‘crown jewel’ of the whole room. The chandlier.
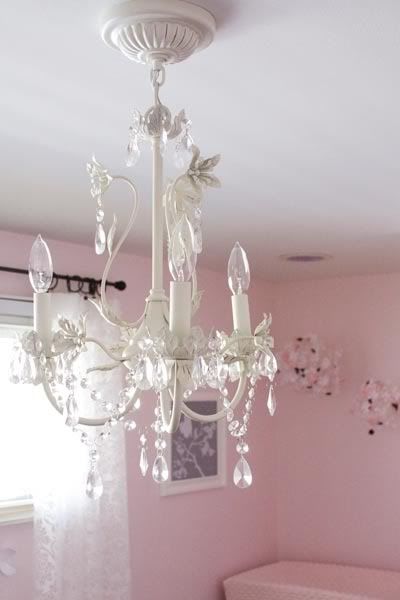
I REALLY wanted a little white chandelier for the room and I found the perfect one at Home Depot. But it was a more than I wanted to pay. So I went on the hunt to find something cheaper. After a LOT of searching I couldn’t find ANYTHING else that even remotely worked. So I took some of my Christmas money and bought the Home Depot one. It was a little bit of a splurge, but it was so worth it because it really just finishes off the room so beautifully!
OK back to the nook . . .
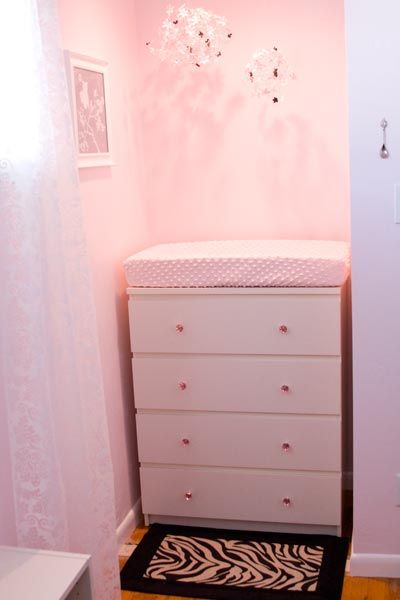
We have a dimmer light above, and it makes for the perfect late night glow in the room. And we found a little zebra rug (the only other zebra thing besides the chair – we did NOT want a CRAZY ZEBRA room. Just these two touches of zebra) at Lowes. We couldn’t believe how it was a perfect match to our chair!
I made the hanging flower ball mobiles. I straight up copied the idea from Young House Love. You can read all about how to make them on their blog.
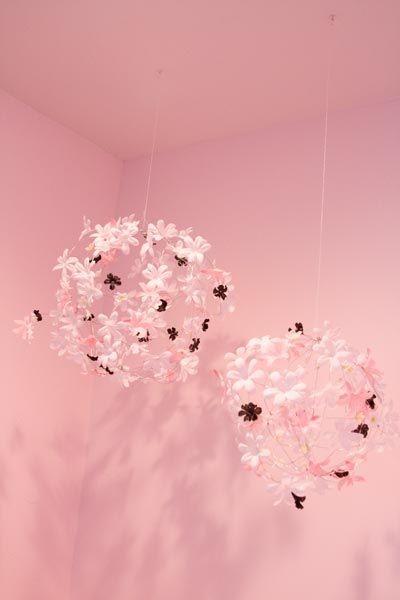
They are really easy to make, but a little time consuming.
I also made this little owl art. I used a few free vectors I found doing a google search as a jumping off point and then just played and drew and created until I was happy.
You also may have noticed the little silver spoon on the wall. My aunt gave us this vintage silver Disneyland spoon at my shower on Saturday! I was totally in love with it and went straight home and found the perfect spot for it in the nursery.

Under the window we have a low book case that’s actually repurposed from our old entertainment center. We took it apart and I went ‘Hey! We could put legs on that and use it in the nursery!”. And that’s exactly what we did.
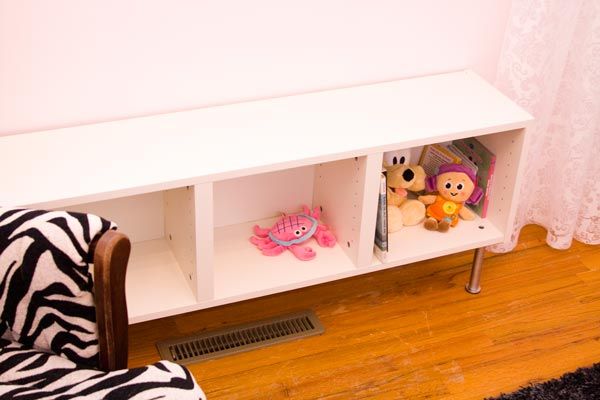
Our goal is to fill it with books. But right now its pretty bare.
Oh my goodness. We’re half way around the room. Are you bored yet? Am I giving you way too much info and details? I hope you’re hanging in there.
On to the closet. The closet has a pocket door, which we were unwilling to dismantle in order to paint so it stayed the same color as the hardwood floors. But mostly I keep it open to see all the cute stuff inside anyway! For now, its organized and pretty (until reality hits I’m sure).
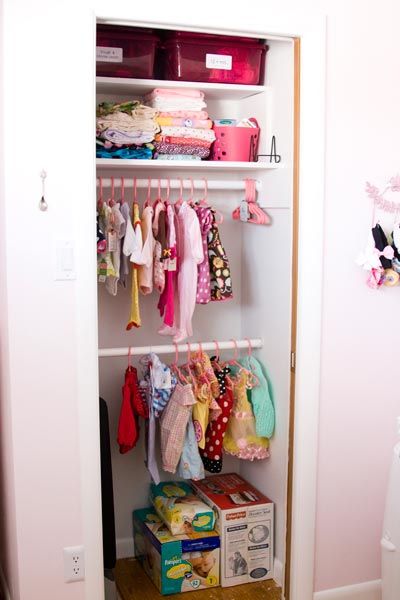
On the top I have bins all labeled with what’s inside. I got baby clothes in sizes from newborn to 18 months at my shower! So I sorted them all out and put the clothes she won’t wear for a while in the bins and labeled them with the sizes. I have one for 6-9 months, and one for 12 + months. One bin has a few “gear” type items in it and one bin is empty. Room to grow! YAY!!

Just to the left of the closet is a little hook thing I bought at Hobby Lobby in their “as-is” area for $3. I have no idea what was wrong with it. But I knew I could hang headbands on it. My friend has a little headband business and gave me SO MANY HEADBANDS at my shower! We were all laughing as I counted out 13 headbands! Plus I got a few from other people too. So, my hooks runneth over. I’ll probably sort these by size and color and not have quite so many hanging on the hooks at one time.
Alrighty, on to the last wall!
First up, our cradle. We’re not co-sleepers, and we don’t have any room in our master bedroom for a basinett or a cradle, so the cradle’s going right in the nursery. She’ll sleep here for the first two or three months and then we’ll get our crib.
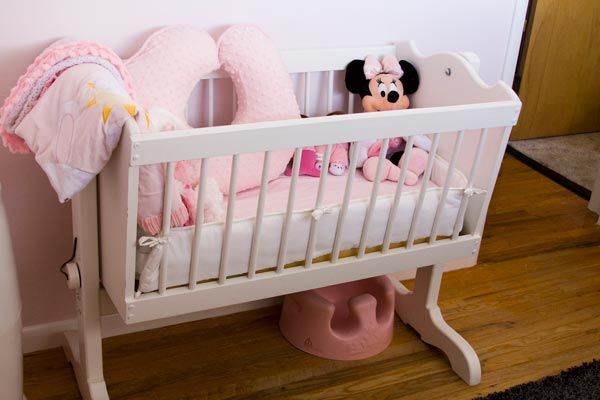
This cradle was one my grandma had. I remember it filled with old dolls in her house. My aunt used this one for her babies, and my mom had an unpainted wooden one. No one is sure where the wooden one ended up, but this one was loaned to us for the time being. It’s so special to have a family heirloom to put our baby in! And don’t worry. Because the cradle is very old (we aren’t actually sure when it was made or painted) we covered our bases and did a Lead Check (thanks yet again to YHL) and there’s no lead to be found! Whew.
Oh and obviously we’ll empty everything outta there once we have a baby to put in it. Right now its full of pretty gifties we’ve received over the past couple months.
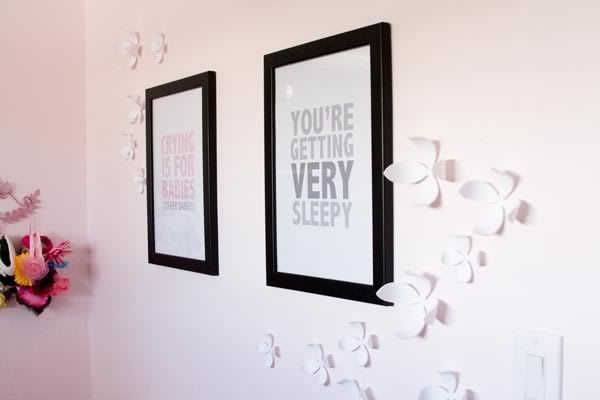
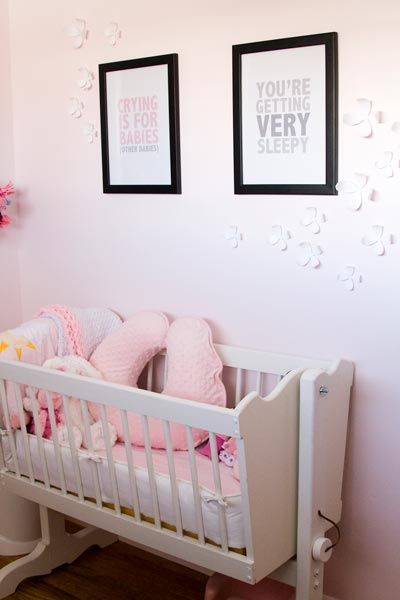
The art above the cradle was inspired by art I saw in Screamy Mimi’s nursery. Again, I saw it, fell in love with it and thought, ‘I could totally make that’. The great thing about making your own art is you can get exactly the colors you want! As I made all the art for this room I used the same color swatches, so it all coordinates. I love how these prints turned out. They add just the right little sense of humor I wanted for the room.
The night we hung the art, I was loving it. But I thought the wall needed something else to finish it. So I went back to that Screamy Mimi post and checked out what she had around her art. And then it hit me. Those Umbra Wallflowers would be the perfect finishing touch in our room.
So after a day to think it over, I ordered a set from Amazon. They came a few days later and I went straight to work hanging them up that night.
They used to make these flowers as magnets. They come with little tacks and then the flowers would magnet to the tacks. But now they make the flowers just pop right onto the tacks. I like it this way, because I’m not at all worried about the flowers falling off. BUT if they do get bumped or yanked off by little hands, they are just plastic and won’t break.
I used blue tacky stick to place each flower where I wanted it. I’d arrange them, step back and look, make little adjustments until I was happy. Then, one at a time, I’d lift the flower, place the tack, Josh would hammer it in and I’d pop the flower on it. It was a great way to get just exactly the arrangement we wanted.
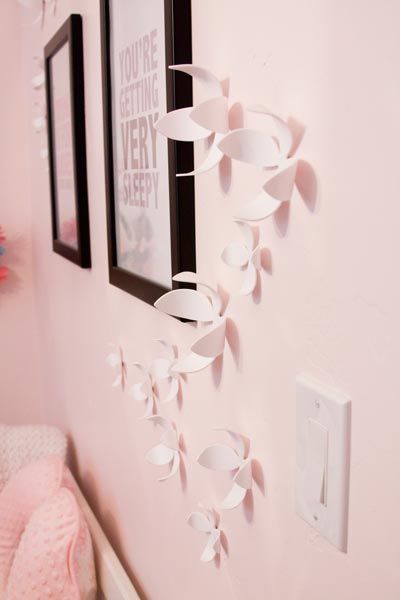
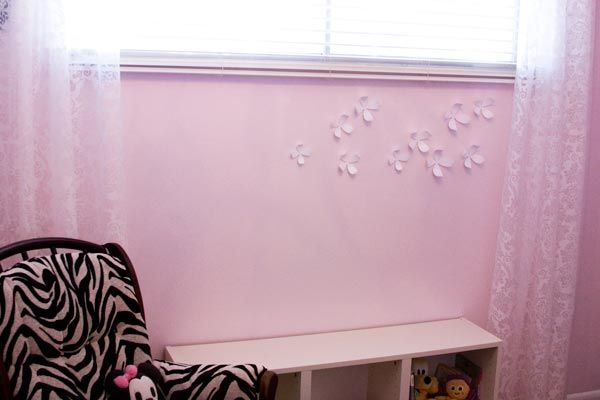
We had extra flowers so they went on the opposite wall under the window. You might have noticed them in the other photos of that wall.
And that, my friends, is a VERY COMPREHENSIVE and detailed look at our new nursery. Finishing the nursery has made us SUPER excited to bring a baby home. If you have any questions about something we did, where we bought something, etc, please feel free to ask. We owe a lot of what we did, things we learned, purchases we made to online sources, so we’re more than willing to pass along any info we’ve gained along the way.

I just LOVE YHL! I'm so inspired by your nursery. So beautiful and functional. Now all it needs is a sweet baby girl. 🙂
Britt…I'm so jealous of your room! It turned out darling! I have 5 kids and never had something this cute!! You may have inspired me to "decorate" my kids rooms a little more…great work you guys!
OH BRITT! It's darling and just perfect! You guys did an awesome job!
I love the art best! It's just the cutest!!!
Oh Britt, it's just wonderful! And a perfect place to welcome home your little girl. You two accomplished so much — bravo!!
OH, it's so perfect !!! One of the things I don't like about pink is it can overwhelm you…but your nursery is perfect !! I LOVE the Zebra touches and Your Artwork !!! Great Job!! Now all that's left is the Little Bundle of Joy !!!! Can't wait !!!
I absolutely adore it! You have worked hard and it shows. It is just perfect! You know Kenzie and I love the zebra!
It looks awesome – great work! (What a view, too!) I could see all the YHL influences, even before you pointed them out. 🙂
OH MY GOSH.
it is SO much cuter than i could even imagine. LOVE it!!
Wow, what an amazing and absolutely ADORABLE nursery! I am not at all surprised at how fabulous it is and loved reading/seeing every detail!
Wow. That turned out great! I love the art you created!
Wow! The nursery turned out AWESOME! Loved reading every detail and I'm so impressed at how you turned your vision into reality!
That seriously has to be the most ADORABLE nursery Evah!! I'm so in love with that chandelier and the zebra print touches. Awesome work – it really is so beautiful!
Wow Britt, that's a beautiful room!!
I love that you posted so many photos and so many little details too. 🙂
The art is so great, and how special that you made all of it! I love the colors you picked and the little touches of Disney too!
We have that ikea dresser for a changing table too, but I must be a lot shorter than you because we had to get the 3 drawer one. lol
OMG your nursery is just too beautiful, love all the details, makes me wish I had a baby girl right now!! Amazing job Britt, congrats!!!
What a beautiful room! I think it's wonderful that your baby will be coming home to this 🙂
WOW, it looks beautiful Britt! How gorgeous. I loved all the photos and little detail, and how about that view? The mountain will always look like home to her after growing up with that view 🙂
Wow, such a transformation. You have one lucky daughter to be the recipient of all these efforts and hard work. And to have such a creative mommy! It is lovely!
Those eyeball numbers are awesome.
Just beautiful! I love the soft pink and all the dramatic touches! You guys are going to be so glad you did all that work for that little baby so you can just enjoy her and take the most gorgeous pics!! Thanks for sharing with all of us! =)
Beautiful, gorgeous, adorable room. I totally love it!!!
Absolutely beautiful! Thanks for sharing all the info, especially the links!
So so so cute! I love it and I'm sure she will too!
wow – thats amazing Brit! We just stuck our twins in a guest bedroom. Fortunately there was enough room at the foot of the queen bed for two cribs and thats where they went. No baby touches at all – sometimes I miss having done that, but they grow so fast and we moved when they were 17 months old – it would be sad to leave all that hard work behind. Beautifully documented – I'll have to share with some of the expectant moms I know.
Beautiful job! Your hard work paid off.
The nursery is just beautiful! You guys did an amazing job. The chandelier really brings a magical touch to the room.
It's GORGEOUS!!!! (But you knew that already!) You've got one lucky little girl there. Thanks for sharing!
WOW!!!!! How fun to have pictures! It's been fun to hear about the process and then see it all finished up. She's going to LOVE it. Talent! That's my girl! Love you,
MOM
That is THE MOST BEAUTIFUL nursery I have ever seen! And the scene out the window is gorgeous! What a lucky little girl! You can tell she's already so loved! Wonderful job!
It's so beautiful!!!!!!!! I'm totally in love!! Love the Zebra elements and those flowers are the bom!!
Love Patty
What a gorgeous nursery Britt! I love your touches of whimsy and I ache for that pink! Lovely job! I'm excited to see the rest of the house tour some day!
Wow, that is a beautiful room! Love the soft pink with the bold zebra pattern. The artwork you made is so cute! What a lucky little baby!
This is so beautiful!! I just got to take a peek and it is amazing. Now you just need your babiy.
Britt!!! It turned out BEAUTIFUL! I am totally jealous. All of your hard work has paid off and your baby girl has an amazing room to come home too. You my friend are so very talented.
WOW!! Baby …. is one lucky lucky girl to have such a pretty room that mommy and daddy made for her. Just gorgoeus guys!! (pssst. I see her Minnie dress hanging up.) SQUEAL!!
Oh, and I second that all girls must have chandeliers. I think Sophie has one almost exactly like that in her room!
i love it! WTG! you really rock with your designs and ability to create!
Congratulations! Beautiful nursery! Great job on it. I especially love the wall posters you made with the saying. I wish I knew how to make them. 🙂
Best wishes to you and your upcoming arrival.
What a beautiful room, really well done.
Love it! And no, not too much detail. i have been glued to the HGTV channel and I love seeing this transformation. Your design is perfect. Truly lovely, elegant, and fem. Great job!
Your nursery is just adorable. I really love all of the little Disney touches. All of your hard work really paid off. Enjoy this magical time…
That is beautiful. I feel now that I need to spruce up my little one's room! Love the views of Timp. I love living in Utah County!
So adorable!!!! Can't wait to see it in person! Love you!
WOW! WOW!! I can't believe how incredible it turned out…oh wait yes I can because you are so talented and amazing!! I can't wait to see it. Love it!
The room is beautiful! You did a fantastic job. Congratulations!